So, what’s the reason behind the Windows Audio Device Graph Isolation issue, and how you can fix high CPU and GPU usage? Read along to find out. Let’s begin from the start.
What is Windows Audio Device Graph Isolation
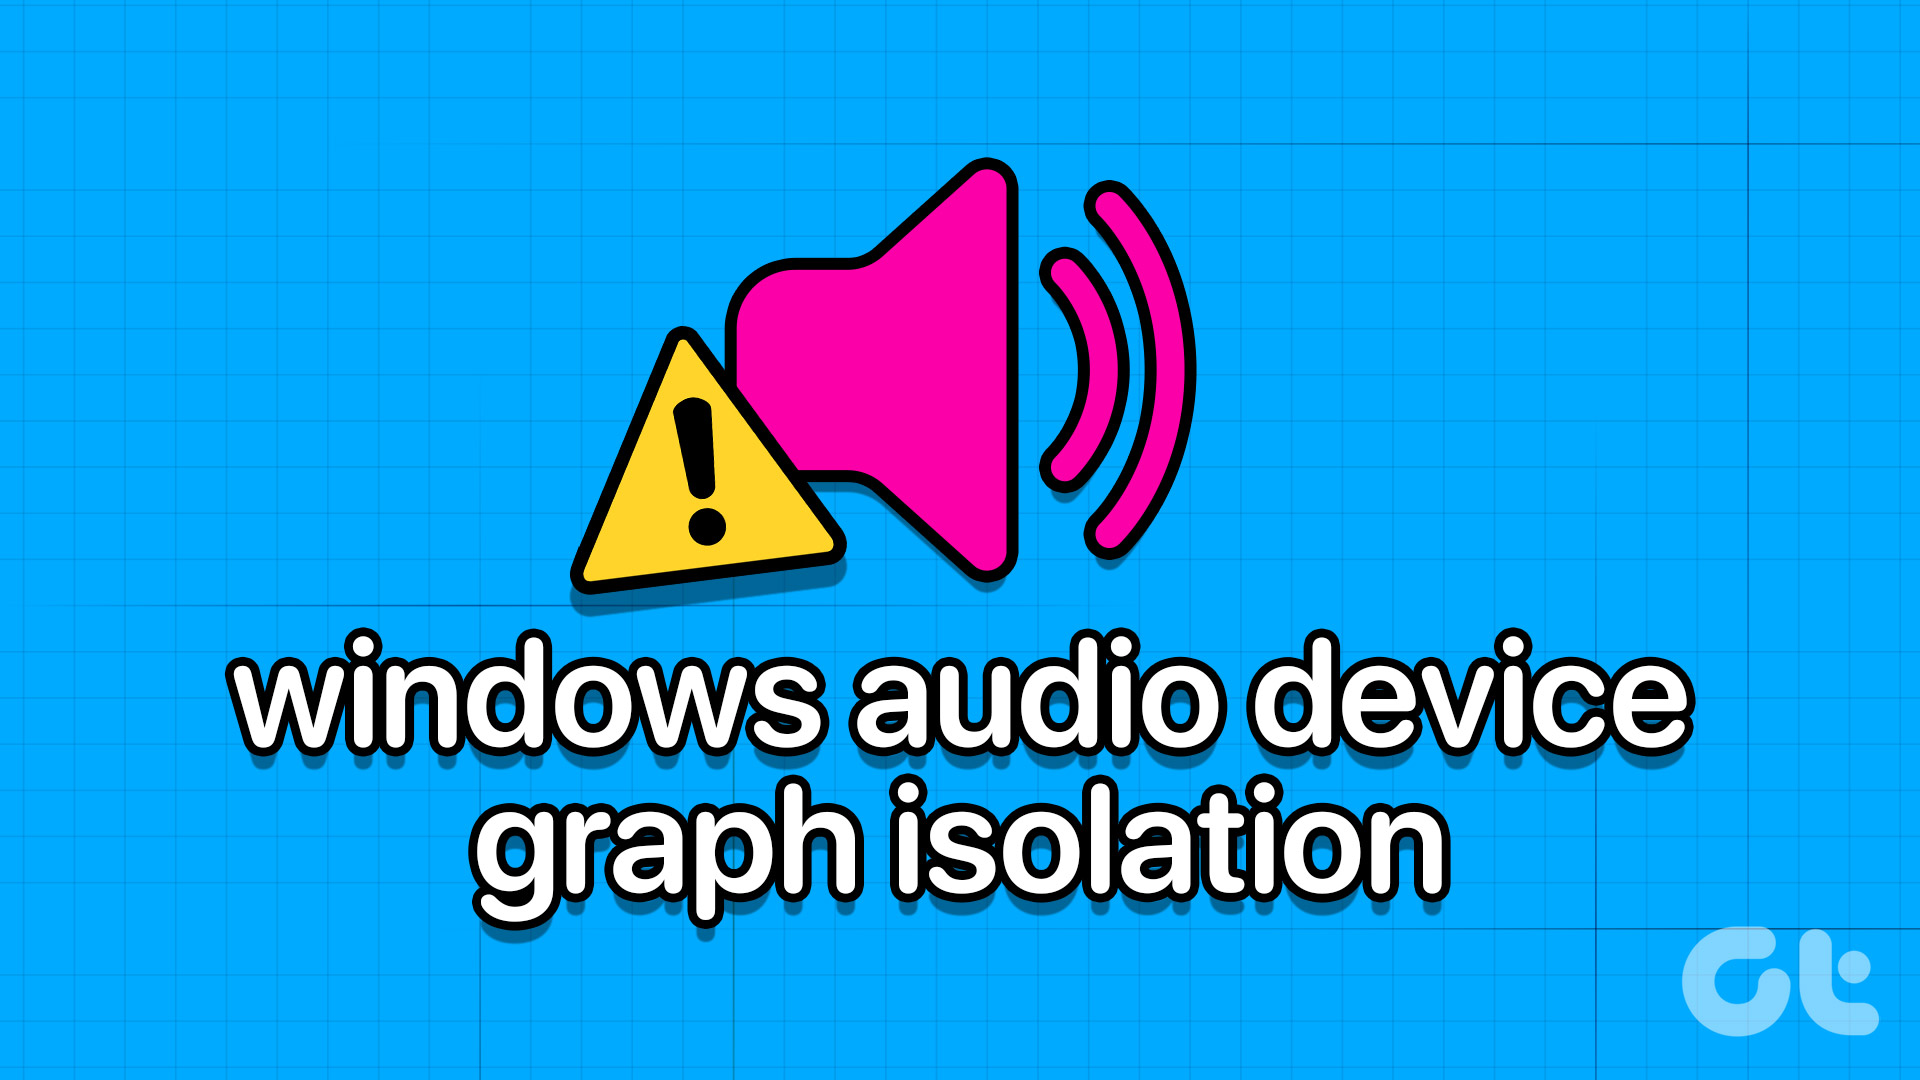
Windows Audio Device Graph Isolation, also known as audiodg.exe, is a process that handles digital signal processing which includes advanced sound enhancement effects on your Windows computer. It’s like a manager that keeps audio tasks organized and prevents any problems from crashing your whole system. It also helps to improve the performance of your computer by ensuring all audio tasks run smoothly. Users can also adjust certain audio parameters such as bass, or even create custom sound effects. However, sometimes even this program can cause issues on your system, leading to high CPU and GPU usage. But don’t worry! With a few troubleshooting steps listed in the next section, you should be able to fix it.
10 Ways to Fix Windows Audio Device Graph Isolation High CPU Usage
Now that you know Windows Audio Device Graph Isolation (audiodg.exe) is not a foe, it’s time to look at all the reasons why it consumes so much CPU and GPU and how you can fix it.
1. Use Audio Troubleshooter on Windows
Thankfully, Windows 11 comes with an audio troubleshooter, with which you can identify and resolve almost any issues with your system’s audio components. Here’s how you can use the audio troubleshooter to fix the high resource consumption of the Windows Audio Device Graph Isolation program. Step 1: Search and open Settings from the search bar. Tip: You can also press the Windows key + I keyboard shortcut to open the Settings app. Step 2: Choose System and then choose Troubleshoot. Step 3: Hit Other troubleshooters. Step 4: Now hit Run next to Playing Audio. Step 5: If asked, enter your system passcode. Step 6: Choose your current playback device and hit Next. Once the program runs, it will give you suggestions. Agree on what suits you and see if the issue is solved. If not, we would suggest you perform the steps again, but this time choose a different sound source.
2. Close Windows Audio Device Graph Isolation From Task Manager
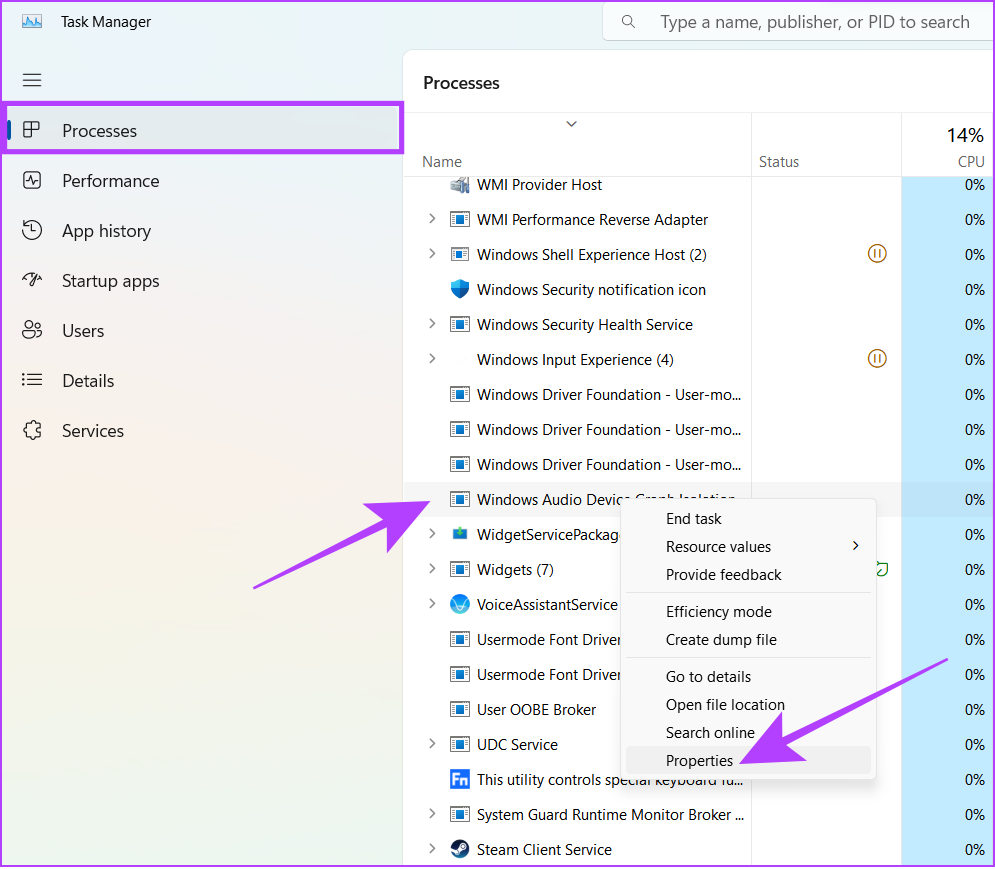
If any program consumes high resources of your PC, it is best to close the program by accessing Task Manager. However, since Windows Audio Device Graph Isolation is a system app, closing it will affect the audio output. Regardless, if you still want to close the program running in the background, here’s what you need to do: Step 1: Open Task Manager with the key combo Ctrl + Shift + Esc. Step 2: Right-click on ‘Windows Audio Device Graph Isolation’ and choose End task.
3. Check the Origin of Windows Audio Device Graph Isolation
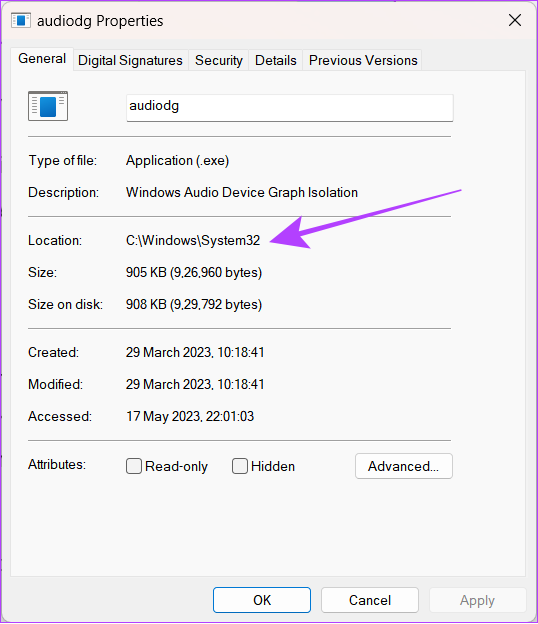
Once malware enters your system, it can act as a system program such as Windows Audio Device Graph Isolation to run in the background discreetly. Since it runs in the background, it can also consume the resource a lot and slow down your system. Here’s how you can ensure that it’s the system program consuming the CPU and GPU and not the malware. Step 1: Open Task Manager by using the key combination Ctrl + Shift + Esc. Step 2: Click Processes. Step 3: Look for ‘Windows Audio Device Graph Isolation’. Tip: You can use the search bar to easily locate the program by searching audiodg. Step 4: Right-click over Windows Audio Device Graph Isolation and hit Properties. Step 5: Click on General and looks at what’s mentioned next to Location. If the process directs you to the C:\Windows\System32 path, it indicates authenticity. Otherwise, it can be some malicious program acting as a system app. We recommend you perform a system-wide malware scan to check this as a safety measure.
4. Scan Using an Antivirus Software
Virus or other malware programs are never a friend to your system. There are many ways through which your system can get affected by malware. Apart from stealing your data, these software can cause issues like pushing your system’s CPU and GPU to its maximum threshold. By default, your system comes with ‘Virus & threat protection’ software to scan the machine. Here’s how you can access it: Step 1: Open Windows search, type Virus & threat protection and open it from the results. Step 2: Select Quick scan. Your system will perform the scan and if it detects any issues, it will let you know about it. Tip: To get better results, you can hit scan options and choose the scan type so that you get a more detailed result. Deep scan also ensures to find any malicious file that went undetected during the Quick scan. Apart from the ‘Virus & threat protection’ app, you can also use ‘Microsoft Safety Scanner’ which also promises to perform similarly. You can download it from the link below. Download Microsoft Safety Scanner (32-bit) Download Microsoft Safety Scanner (64-bit)
5. Recheck Any Recent Changes Made to System
As you know, Windows Audio Device Graph Isolation is a system application and any changes that you make will affect the entire system. While you might not have done any changes manually, it might be done by some applications, or even as a result of any changes you have made to the hardware.
1. Uninstall Suspicious and Recently Installed Software
It’s always suggested to install applications from authorized sources, or else your PC’s security will be at risk. Hence, if you are suspicious or started facing high CPU and GPU usage after installing a specific application, we suggest uninstalling the program on your Windows PC and checking if you are still facing the issue.
2. Unplug and Replug Headset or Speakers
If haven’t gotten the right headset or speaker for your Windows machine, it can do more harm than good. As the device might put more pressure on the system through Windows Audio Device Graph Isolation. Unplug the connection and see if you are still facing the issue. Additionally, if you have recently changed the GPU of your Windows machine or have many other hardware changes, you might see the audio drivers consuming maximum CPU and GPU.
6. Disable All Audio Enhancements
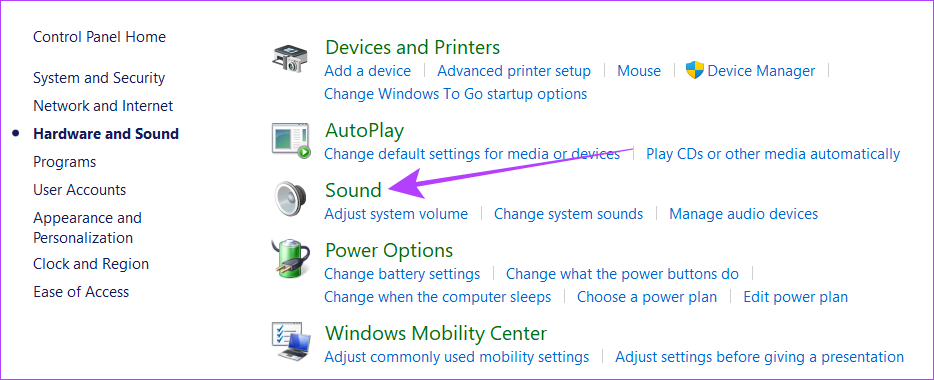
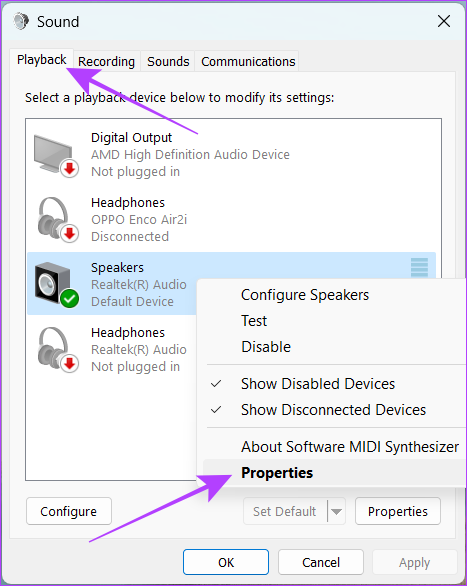
While audio enhancements are great to improve the sound quality, they can also put some load on your PC. Hence, disable them and see if your PC gets back to normal. Step 1: Open Windows search, type Control Panel and open it from the results. Step 2: Hit ‘Hardware and Sound’. Step 3: Jump to Sound. Step 4: Select Playback > right-click the current sound source and hit Properties. Step 5: Navigate to the Advanced tab and uncheck ‘Enable audio enhancements’. Tip: To ensure there’s no more pressure on your system, you can also uncheck ‘Allow hardware acceleration of audio with this device’. Step 6: Now, click on the Apply button followed by Ok.
7. Reboot System
Are you someone who doesn’t restart your PC for long durations? While most modern Windows machines are capable of running continuously, that doesn’t mean you shouldn’t be restarting them once in a while. When you restart your PC, it will also terminate all the current sessions and clear the temporary files. Sometimes these files might be the reason behind the high CPU and GPU consumption of your system. Hence, we suggest restarting your system once in a while. Just follow these steps. Step 1: Click on the Windows button followed by the power button on the new screen. Step 2: Choose Restart. Step 3: Select Restart anyway to confirm.
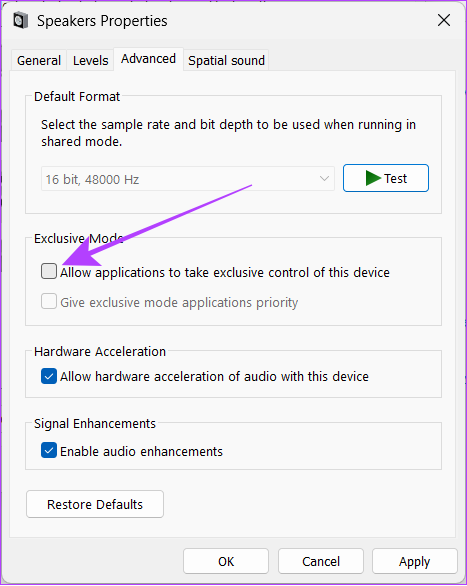
8. Disable Exclusive Mode
Windows comes with an Exclusive Mode, that enables third-party applications to bypass the system’s audio processing engine and utilize resources that the app wants. This might be the reason behind the high CPU and GPU usage by Windows Audio Device Graph Isolation (audiodg.exe) application. You can easily solve this by disabling Exclusive Mode by following these steps: Step 1: Open Windows search, type Control Panel and open it from the results. Step 2: Choose ‘Hardware and Sound’. Step 3: Click on Sound. Step 4: Go to the Playback tab. Right-click the current audio device and select Properties. Step 5: Go to the Advanced tab and uncheck ‘Allow applications to take exclusive control of this device’. Step 6: Click on Apple followed by Ok.
9. Modify Sample Rate and Bit Depth
The sample rate and bit depth are important factors for sound quality. Higher sample rates and bit depths can potentially result in more accurate and detailed sound reproduction. However, that also means more consumption of the resources such as CPU and GPU. Lowering the audio sample rate and bit depth settings of your system can reduce the resource consumption of the Windows Audio Device Graph Isolation process. Here’s how you can do that: Step 1: Open Windows search, type Control Panel and open it from the results. Step 2: Click on ‘Hardware and Sound’. Step 3: Click Sound. Step 4: Go to the Playback tab and double-click the current audio device. Step 5: Go to the Advanced tab and open the drop-down menu. Note: This feature might not be available for some Windows PCs. Step 6: Now, Choose the lowest quality from the current one and select CD quality.
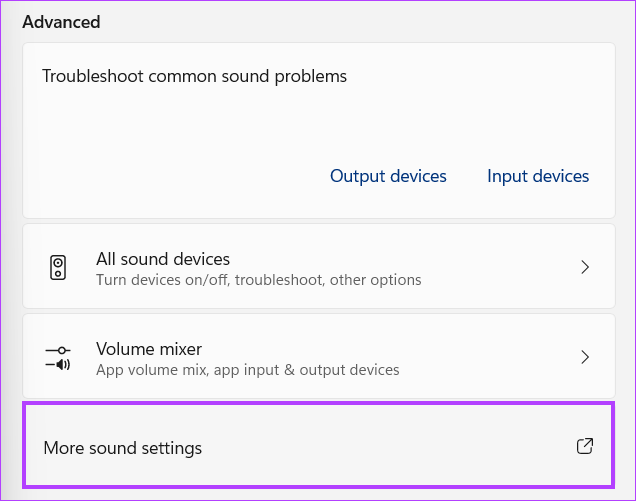
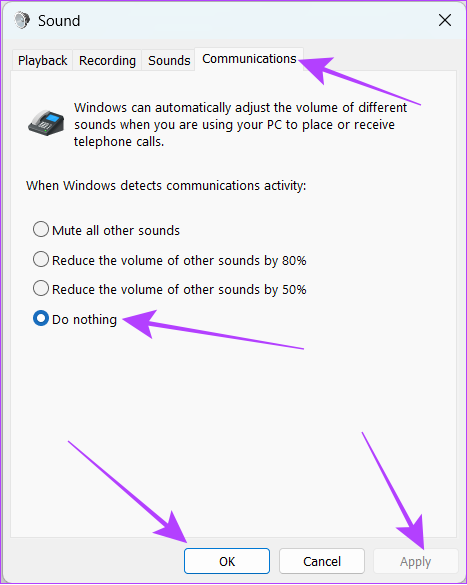
10. Turn Off Automatic Volume Adjustment
Windows has the tendency to automatically adjust the volume levels depending on what you are hearing. However, this can also result in significantly high CPU consumption. To solve this, you have to: Step 1: Right-click on the speaker icon in the taskbar. Step 2: Choose sound settings. Step 3: Scroll down to Advanced settings and click ‘More sound settings’. Step 4: Head over to the Communications tab and choose Do nothing. Step 5: Click on Apply and then OK to apply changes.
11. Update Audio Driver
Audio drivers help your Windows system to communicate between audio hardware components like sound cards or integrated audio controllers. However, if there are some errors or outdated versions of these drivers, they won’t be able to perform accordingly and end up consuming the CPU and GPU resources. Hence, to solve the high consumption of Windows Audio Device Isolation, you can update them and even re-enable them. Here’s how: Step 1: Open Windows search, type Device Manager and open it from the results. Step 2: Expand ‘Sound, video and game controllers’. Note: If you have multiple Windows user IDs, to make any changes to audio drivers, you need to log in to the admin id. Step 3: Right-click the audio source and select Update driver. Note: You can also choose Disable device and then enable it again to see if it fixes the problem. Now, follow the on-screen instructions to update the driver. You can follow the same procedure for all the connected audio devices.
12. Reinstall Audio Drivers
If the high CPU and GPU consumption of Windows Audio Device Graph Isolation are not fixed even after updating the audio drivers, it is best to reinstall the audio driver. To ensure a smooth process, follow our detailed guide on reinstalling sound driver in Windows.
13. Boot in Safe Mode
As mentioned before, the high RAM, CPU, and GPU consumption of Windows Audio Device Graph Isolation (audiodg.exe) occur when third-party apps force the application for that. To prevent this, you can boot your Windows system to Safe Mode.
14. Uninstall and Reinstall Skype
Some users have reported that Skype consumes a good amount of CPU while running. The best solution is to uninstall the application. Here’s how: Step 1: Open Settings on your Windows machine Step 2: Go to Apps > Installed apps. Step 3: Scroll down to Skype and hit the three dots next to it. Step 4: Now, hit Uninstall. Now, that you have uninstalled Skype, you can check out some other good video-calling apps for your system. However, if you are unable to say goodbye to Skype, you can install it again. Just ensure to monitor its resource consumption.
15. Update Windows
It might be not your system or any third-party apps. Instead, the high resource consumption of Windows Audio Device Graph Isolation can be because of some bugs in Windows. To make things easier, look at our detailed guide on how to update Windows on your computer.
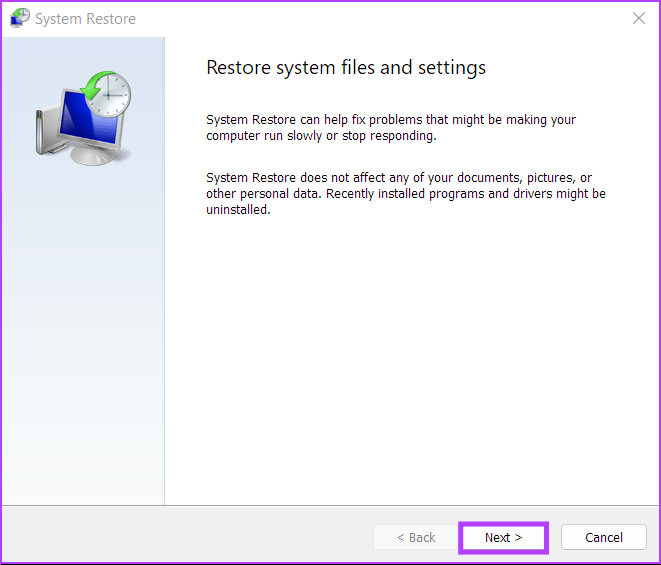
16. Restore Your System to the Previous Restore Point
If all other attempts to resolve the issue fail, you should contemplate returning your system to a previously generated restore point as a final option. With this, any updates that were installed will be also removed, unless and until it was saved in the restore point. Apart from that, you should choose the restore which didn’t have any of the current issues that you are facing. As you might already know that you can only perform the restoration unless and until you have created a restoration point some time ago. Step 1: Open Windows search, type Create a restore point and open it from the results. If asked, enter your system password. Step 2: Click System Restore in the System Protection tab. Step 3: Click on Next to start the process. Step 4: Choose the event from which you want to restore your system and click Next. Tip: If you can’t find the right restore point, check the box for ‘show more restore point’. This will display all your previously created restore points. Step 5: Now, confirm the restore point you want to revert your system to in the pop-up and click on Finish. Now, wait until the process is finished.
Enjoy Music Without Pressurizing System
The Windows Audio Device Graph Isolation process is a program that only requires minimal CPU usage. However, due to some reason if it has been consuming huge resources in your PC, we hope this guide helped you in solving that. The above article may contain affiliate links which help support Guiding Tech. However, it does not affect our editorial integrity. The content remains unbiased and authentic.


![]()