Some possible reasons for this problem include the Fast Startup feature, a buggy Windows update, glitched services, or system file corruption. Try the following methods to fix the Explorer.exe not working at startup problem on your Windows 11 computer.
1. Disable Fast Startup
Fast Startup hibernates the core system and kernel-level processes while closing the rest. But it can cause trouble booting to the desktop if hibernated processes don’t work normally. So, disabling Fast Startup can resolve the issue. Here’s how: Step 1: Press the Windows + R keyboard shortcut to launch the Run Dialog box. Type the following shortcode in the text box and press Enter: Step 2: When the System Settings window opens, click on the ‘Change settings that are currently unavailable’ option. Step 3: Uncheck the ‘Turn on fast startup (recommended)’ option checkbox. Click on the Save Changes button. Step 4: Close the Control Panel window.
2. Configure Services Related to File Explorer
When there’s a conflict between services to access the same resources, it may end up crashing Windows Explorer or prevent it from launching. App Readiness is one such notorious service that interferes with Explorer.exe from launching at startup. You may consider disabling it temporarily. Step 1: Press the Windows key, type services.msc in the search bar of Start menu and press Enter to launch the Services utility. Step 2: Find the App Readiness service in the list, right-click on it and select the Properties option. Step 3: Go to the Startup type section and select Disabled option from the drop-down. Step 4: Click on the Apply button and then click on the OK button. Step 5: Restart your computer. Step 6: If you encounter a black screen again, press Ctrl + Shift + Esc keyboard shortcut to launch the Task Manager and click on the Run new task button. Type sihost.exe in the text box and press Enter. Close the Task Manager.
3. Update the Graphics Driver
Outdated and corrupt graphics drivers can cause issues with the display settings. So, you must manually update them using the device manager. Here’s how to do it: Step 1: Right-click on the Start button to open the Power User menu. Select the Device Manager option. Step 2: Expand the Display adapters section and right-click on the graphics card name. Select the Update driver option. Step 3: Select the ‘Search automatically for drivers’ option. Wait for the tool to download and install the latest drivers on your system. Step 4: Close the Driver update window.
4. Tweak the Registry
A misconfigured registry entry can cause the Windows Explorer to not launch at startup. So, you have to manually configure it to launch explorer.exe at startup. But before doing that, back up your registry so you have the option to revert to the original one if anything goes wrong. Repeat the following steps: Step 1: Press the Windows key, type regedit, and press Enter. Step 2: User Account Control will pop up. Click on the Yes button. Step 3: Paste the following path in the address bar and press Enter: Step 4: Look for the Shell value in the right pane. If it doesn’t exist, right-click on the right pane, select New, and choose String Value. Step 5: Name the newly created value Shell and double-click on it. Enter the following text in the Value data field and click on the OK button. Step 6: Close the Registry Editor and restart your computer to apply the changes.
5. Run SFC and DISM Scans
System File Checker (SFC) and Deployment Image Servicing and Management (DISM) are system-level scans that check and replace the corrupt or missing files with a new copy and fix the component store of Windows image. You’ll need to run these scans one by one using an elevated command prompt window. Here’s how to do it: Step 1: Press the Windows key, type cmd, and click on the Run as administrator option. Step 2: The User Account Control window will launch. Click on the Yes button. Step 3: Now, type the following command and press Enter: Step 4: After the SFC scan completes, type cls in the Command Prompt window and press Enter. Step 5: Type out the following commands and execute them one by one: Step 6: Wait for these scans to complete. Restart your computer and check if your face the same issue with explorer.exe.
6. Create a New User Account
A corrupt user profile can result in Windows errors and unexpected crashes. So, you must create a new user account with admin privileges. Here’s how to do it: Step 1: Disconnect your computer from the Internet. Press the Windows key, type Other users and press Enter. Step 2: Click on the Add Account button. A new Microsoft account window will launch. Step 3: Enter the user name, password, and select three security questions and their answers. Then, click on the Next button. Step 4: The new user account will appear on the Other users page. Click on the arrow button to expand the options and then click on the Change account type button. Step 5: Expand the drop-down list next to the Account type option. Select the Administrator option. Click on the OK button. Step 6: Press the Windows key to open the Start menu. Click on the Profile icon and then select the newly created user. Step 7: You will be signed out. Enter the password for the new account and wait for the system to prepare the new profile and boot to the Desktop.
7. Rollback Windows Update
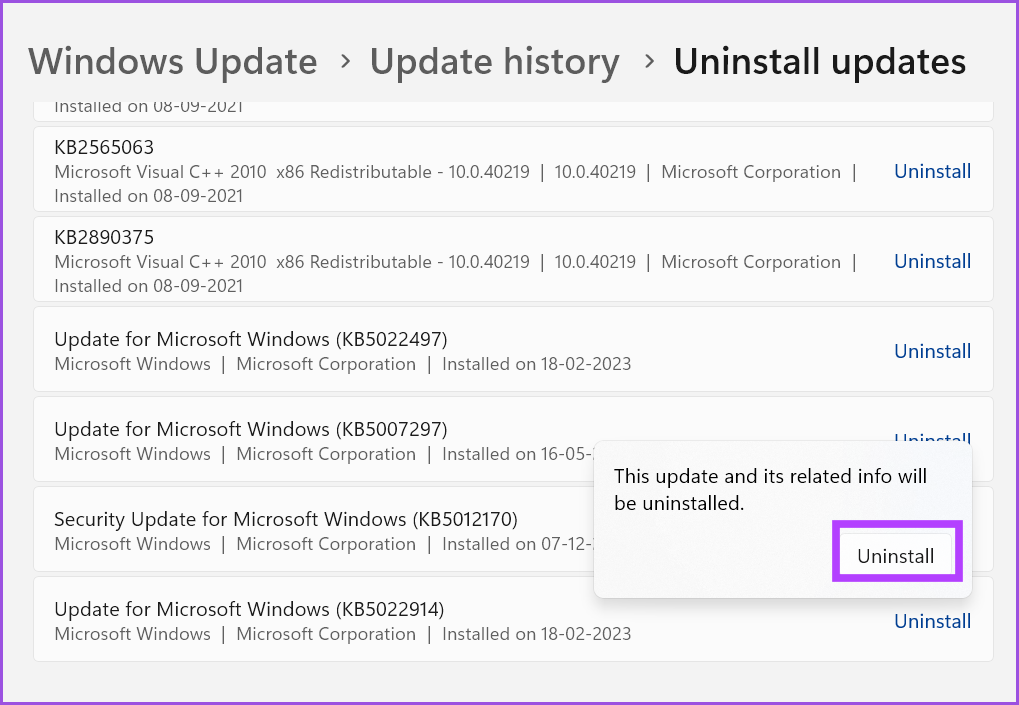
Windows updates bring new features and security fixes. But often, they can break critical system features. If you face the Explorer issue after installing a system update, you must roll back the update. Repeat the following steps: Step 1: Press the Windows + I keyboard shortcut to launch the Settings app. Click on the Windows update icon. Step 2: Click on the Update history option. Step 3: Navigate to the bottom of the screen and click on the Uninstall updated option. Step 4: Find the most recently installed by checking the installation date. Click on the Uninstall button. Step 5: Click on the Uninstall button again. Wait for Windows to remove the update from your computer.
Get Explorer Working Again
If explorer.exe doesn’t run at startup, it makes it really difficult to browse files on your computer. Start with the preliminary fixes and then disable the App Readiness service. After that tweak the registry to start the explorer.exe when you log in to Windows. Roll back the Windows update only when all the other options result in despair. The above article may contain affiliate links which help support Guiding Tech. However, it does not affect our editorial integrity. The content remains unbiased and authentic.


