There can be several reasons why the camera might stop working on your Windows 11 PC, right from compatibility issues to damaged or malfunctioning drivers. In some cases, a lack of relevant camera permissions may also lead to such problems. Whatever the cause, this guide will walk you through all the possible solutions for the webcam not working issue on Windows 11. So, let’s take a look.
1. Check if Your Webcam Is Compatible
Before proceeding with any troubleshooting steps, it’s a good idea to check if your webcam is compatible with Windows 11, especially if it is an older model. You can usually find this information in the webcam’s documentation or on the manufacturer’s website.
2. Restart Your PC
If it’s just a one-off glitch that’s causing issues with your webcam, restarting your PC should help. To do so, right-click on the Start icon and select ‘Shut down or sign out’ > Restart. After your PC reboots, check if the issue is still there.
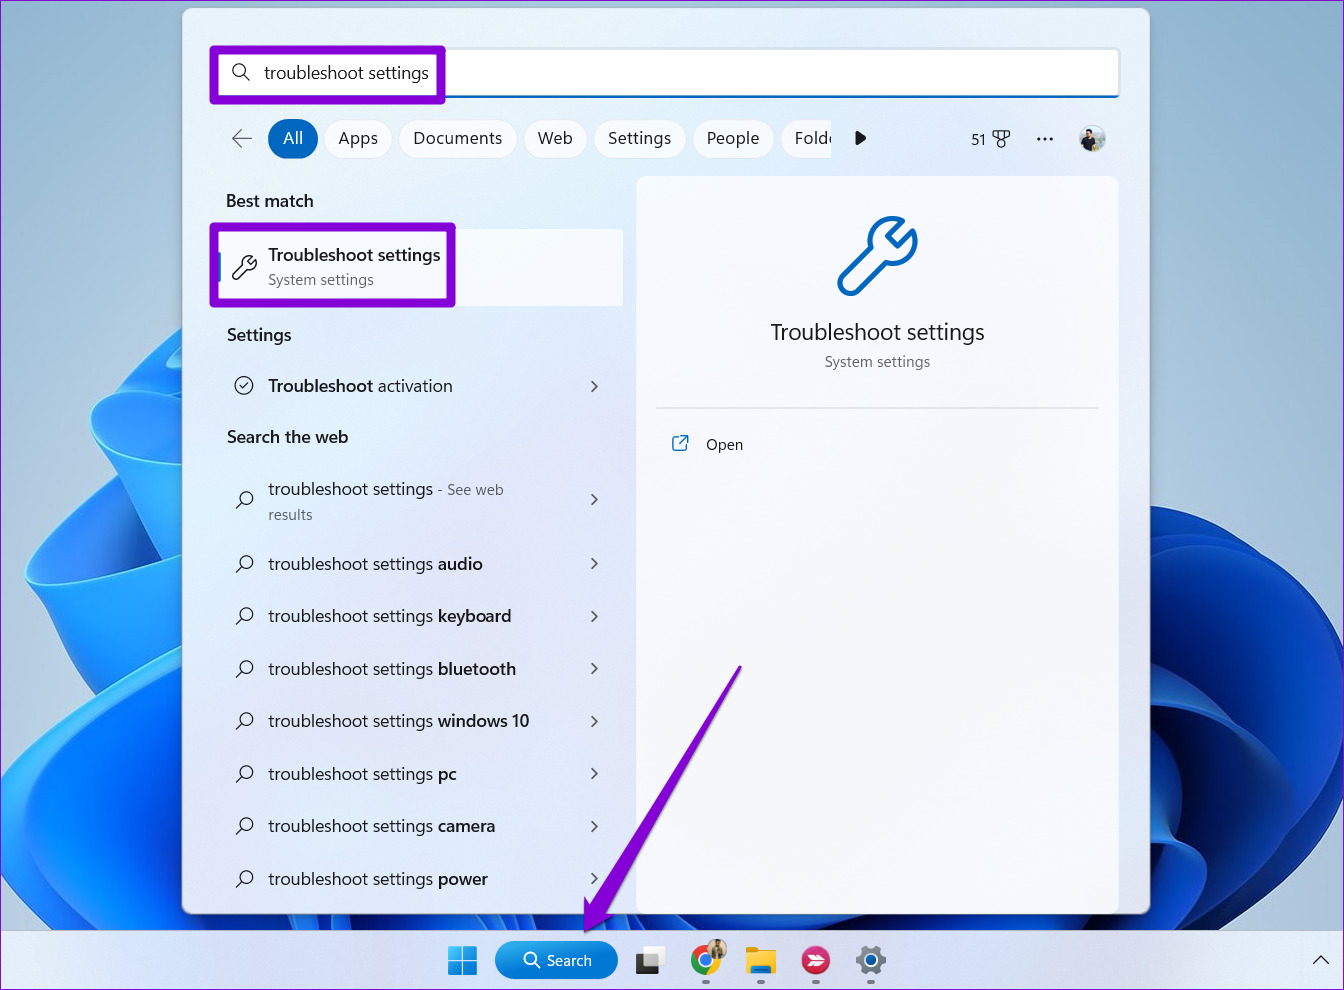
3. Run the Camera Troubleshooter
Windows offers a range of troubleshooters for diagnosing and fixing system-related issues. In this case, running the camera troubleshooter can help. Here are the steps for the same. Step 1: Press Windows Key + S to open the search menu, type in troubleshoot settings, and press Enter.
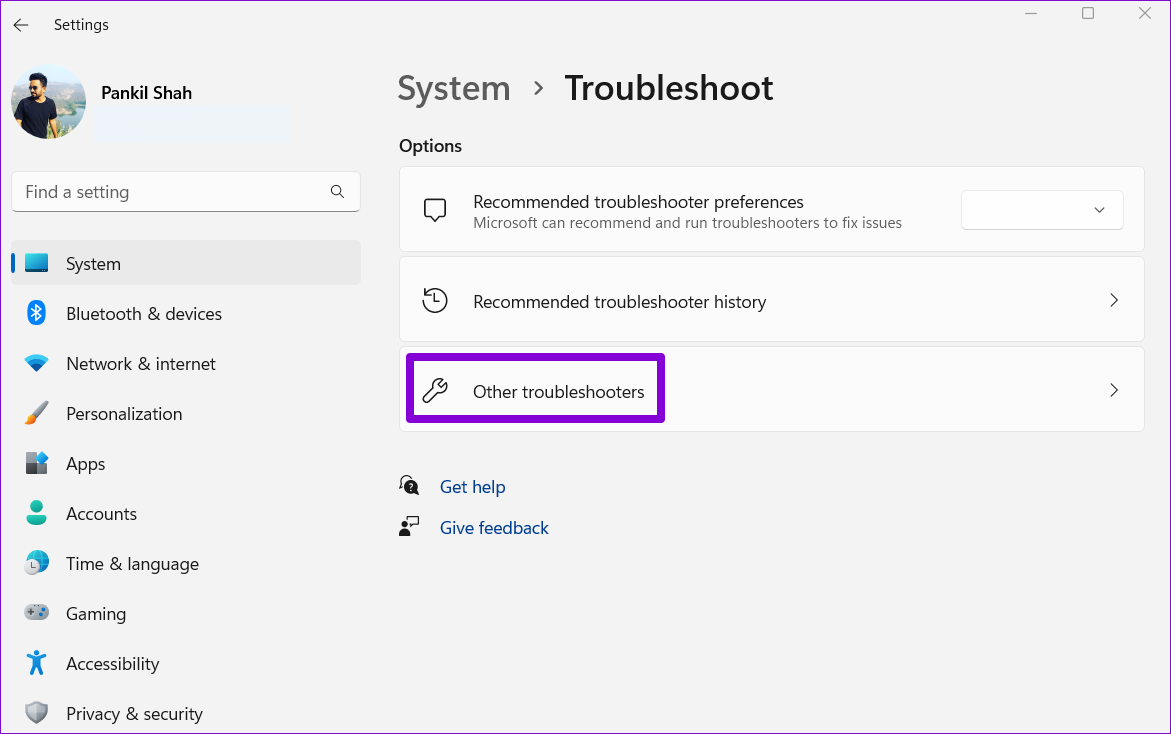
Step 2: Go to Other troubleshooters.
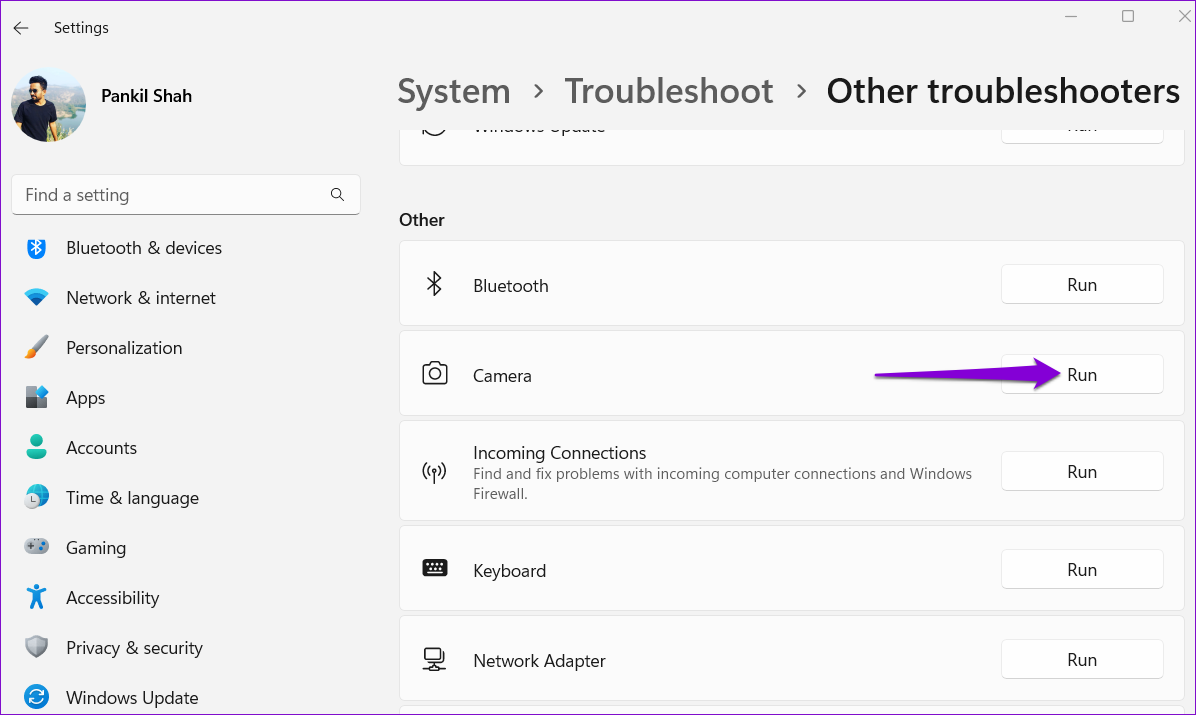
Step 3: Click the Run button next to the Camera and follow the on-screen instructions to run the tool.
4. Check the Connection
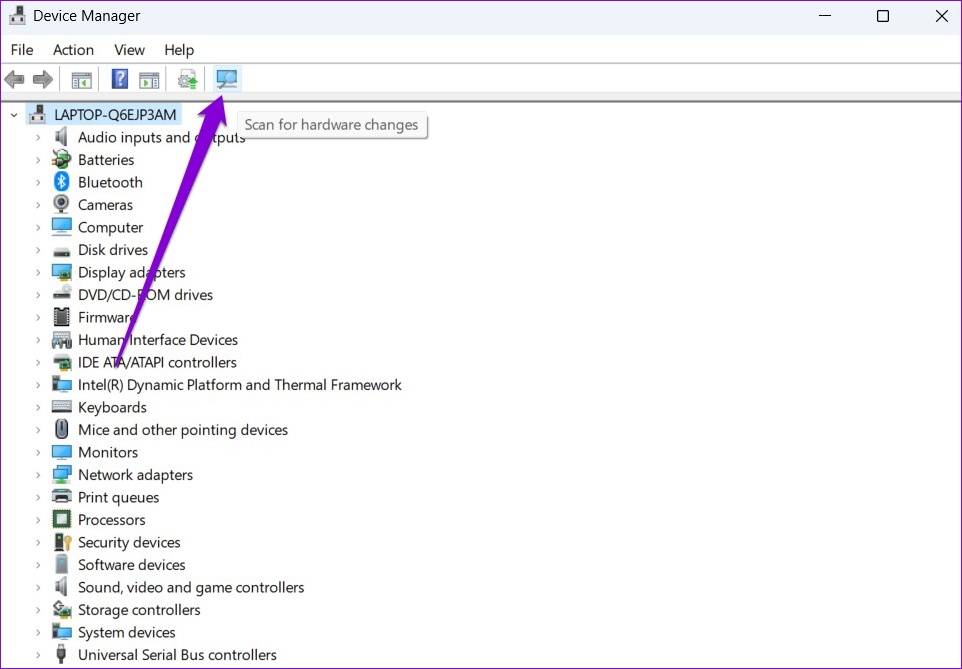
If you’re using an external webcam, make sure that it is connected properly. You can also try switching to a different USB port to ensure that the issue is not related to a malfunctioning USB port. Also, if your PC or external webcam has a physical on/off switch, make sure to check that out too. If reconnecting the camera does not help, you can try scanning your computer for hardware changes. To do so, use these steps: Step 1: Press the Windows key + S to open the search menu. Type device manager in the box and press Enter.
Step 2: Click the ‘Scan for hardware changes’ icon at the top.
5. Check Permissions
Next, you should review the app permissions on Windows and ensure that the app you’re trying to use is allowed to use the camera. Here’s how you can go about it. Step 1: Press the Windows key + I to launch the Settings app. In the Privacy & security tab, click the Camera option from the right pane.
Step 2: Enable the toggle next to Camera access.
Step 3: Make sure the app you’re trying to use has camera access.
6. Disable Antivirus
Some antivirus software include a privacy setting that prevents apps from accessing the camera on Windows. To check for this possibility, you can disable your antivirus momentarily. If this gets the camera working again, you should dig into your antivirus program’s settings and allow camera access from there.
7. Re-Enable the Camera From the Device Manager
Several users reported resolving the camera issues on Windows by simply disabling the camera driver and enabling it again. You can also give it a try. Step 1: Click the search icon on the taskbar, type in device manager, and press Enter.
Step 2: Expand Cameras, right-click on your webcam, and select Disable device.
Step 3: Right-click on the webcam again and choose Enable device.
8. Test Your Webcam Online
Another thing you can do is test the webcam in your browser by visiting a website like Webcam Test. This should help you determine whether the camera problem is specific to the app or program you’re using. If the camera works fine in your browser, you can consider repairing the problematic app in Windows 11.
9. Reset the Camera App
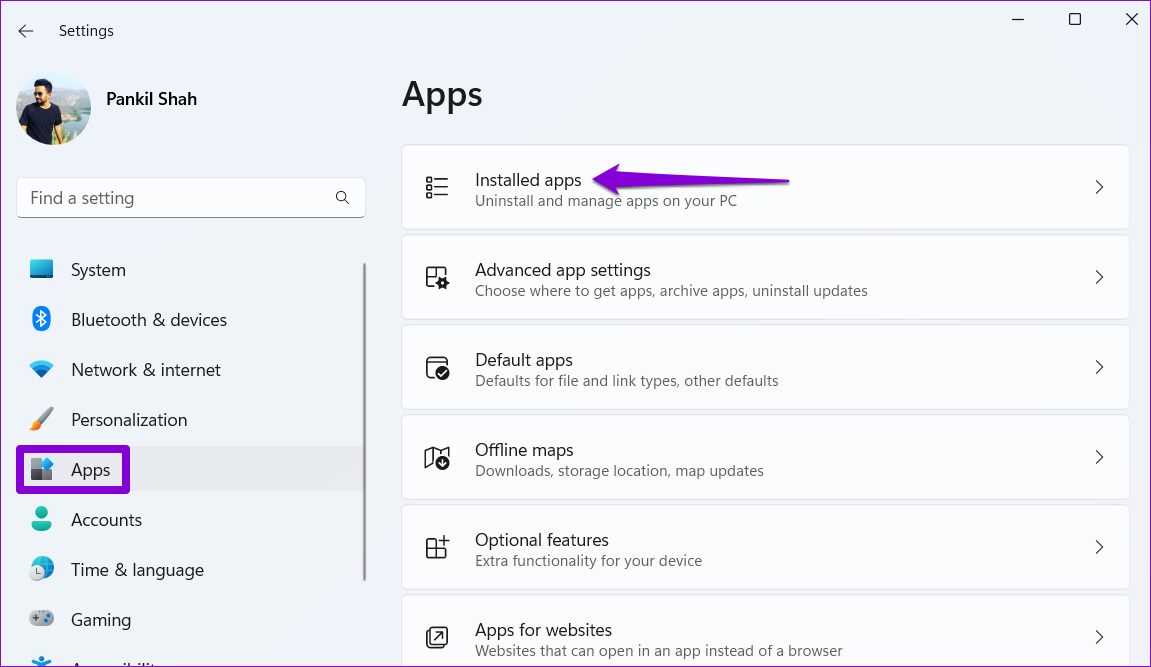
If you’re still unable to access the camera, there might be a problem with the Camera app itself. In that case, you can try resetting the app on Windows by following the steps below. Step 1: Press Windows key + I to open the Settings app. Step 2: Use the left pane to navigate to the Apps tab and click on Installed apps.
Step 3: Locate the Camera app on the list, click the three-dot menu icon next to it, and select Advanced options.
Step 4: Scroll down to the Reset section and click the Reset button.
10. Update or Reinstall Camera Drivers
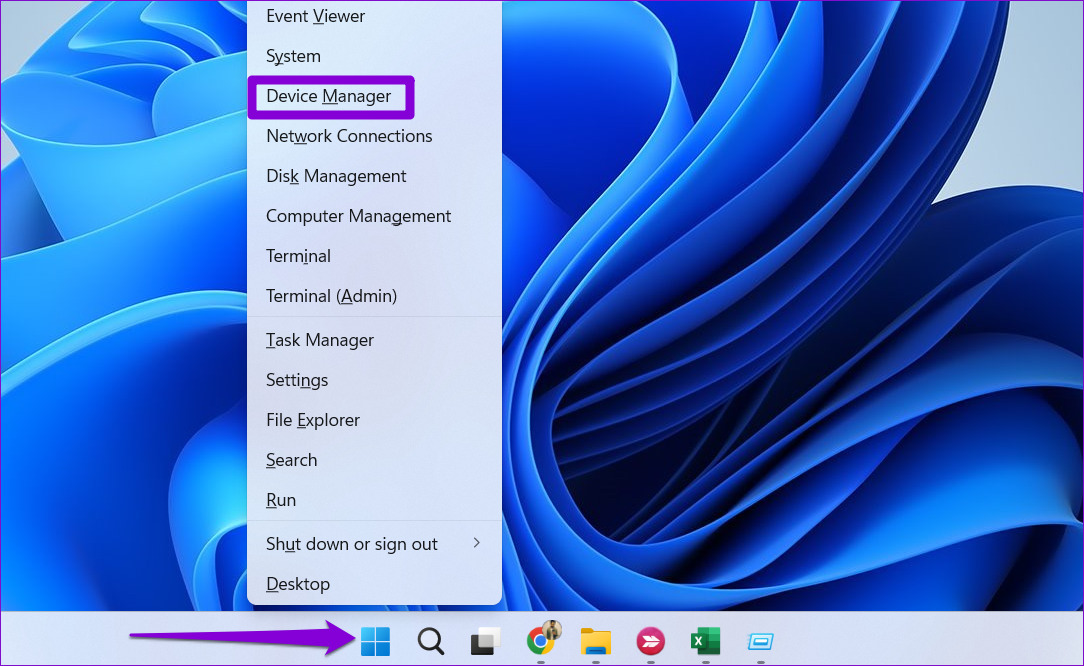
Since Windows relies on drivers on your PC to detect and work with the camera, this problem can also occur if those drivers are outdated or incompatible. To resolve that, you can try updating the driver to see if that helps. Step 1: Right-click on the Start icon and select Device Manager from the list.
Step 2: Expand Cameras, right-click on your webcam, and select the Update driver option. Then, follow the on-screen prompts to finish updating the driver.
If the problem persists, it might be the case of drivers being corrupted. In that case, you should uninstall the drivers via Device Manager and then restart your PC. Windows should install the missing drivers automatically on boot.
11. Update Windows
Windows updates typically include driver updates and bug fixes, along with performance improvements. So, if nothing works, you can try installing any pending updates on your PC and see if that helps. For that, press the Windows key + I to open the Settings app. In the Windows update tab, click the Check for updates button to download and install pending updates.
While you’re at it, you should also check your system for optional updates. In the Windows Update tab, navigate to Advanced options > Optional updates. Download and install all the driver updates and try to use your webcam once again.
Smile, You’re on Camera
Few things are more frustrating than a webcam that isn’t functioning properly. Hopefully, one of the above solutions has proven helpful, and the camera on your Windows 11 desktop or laptop is now working as expected. As always, make sure you let us know which solution worked for you in the comments below. The above article may contain affiliate links which help support Guiding Tech. However, it does not affect our editorial integrity. The content remains unbiased and authentic.