The easiest and the best way to back up your iPhone’s data is via iCloud. However, iCloud only gives you 5GB of free storage. So, if you have a lot of data, you will have to buy more storage. If you don’t want to shell out, Google Drive is a good alternative. It offers 15GB of free storage which should suffice for most users. If you wish to switch from iCloud, read along to know how you can back up iPhone data to Google Drive.
Types of iPhone Data You Can Back Up to Google Drive
Before we begin, you’re probably wondering what kind of data you can back up from your iPhone to Google Drive. Is it like an iCloud backup where your apps, settings, passwords, etc. are also backed up? Unfortunately, backing up your iPhone data to Google Drive isn’t as comprehensive and seamless. There are just three types of iPhone data you can back up to Google Drive: Photos (and videos), Contacts, and Calendar events. Additionally, you can also backup your files to Google Drive directly using the Files app on your iPhone. To ensure you have enough space, read our guide on what counts and what doesn’t with Google Drive storage. If that sounds good to you, proceed to the next section for steps.
Things to Remember Before Taking a Backup on Google Drive
There are some pre-requisites that you need to be aware of before starting the backup process.
Ensure you’re connected to a Wi-Fi network for a reliable connection and not mobile data. If you’ve already taken a backup previously, the new backup will only include newer data that wasn’t backed up earlier. So, if you have 1200 photos out of which 1000 were backed up earlier, only the 200 photos will be backed up the next time. Weirdly, organizing your photos in terms of albums would mean they don’t get backed up via this method. Lastly, contacts or calendar events via third-party services like FaceBook will not be backed up.
Now that you’re all set, let’s move on to the process.
How to Back Up iPhone Data to Google Drive Manually
Let’s first take a look at how you can back up photos, videos, contacts, and calendar events natively via the Google Drive app. Step 1: Go to the App Store on your iPhone. Step 2: Tap on the Search icon at the bottom right. Step 3: Use the search bar to look for Google Drive. Step 4: Install the Google Drive app. If you’ve it installed, update it to the latest version. Step 5: Now, open the Google Drive app. Step 6: Tap on the three horizontal lines at the top left to see additional options. Step 7: Select the Settings option. Step 8: Tap on Backup. Step 9: This is where you will be asked to choose what data you want to backup. Select the Contacts option and enable the toggle if you want to backup your iPhone’s contacts to Google Contacts. Then, go back and select Calendar events and enable the toggle. Finally, select Photos & videos and enable the toggle. You can also choose the quality of photos you want to backup. Original quality will take up more space so we don’t recommend it if you have just 15GB of free space. High-quality is the better option since you don’t really lose much in terms of quality and it occupies lower storage. Note: If you want to backup your photos in original quality and are running low on storage, take a look at some of the best ways to free up storage on Google Drive. Step 10: With all the relevant options selected, hit the Start Backup button. That’s pretty much it. Your iPhone data will be backed up to Google Drive. You can access your backed-up photos and videos via Google Photos, contacts via Google Contacts, and calendar events via Google Calendar.
How to Back Up Files and Folders on Your iPhone to Google Drive
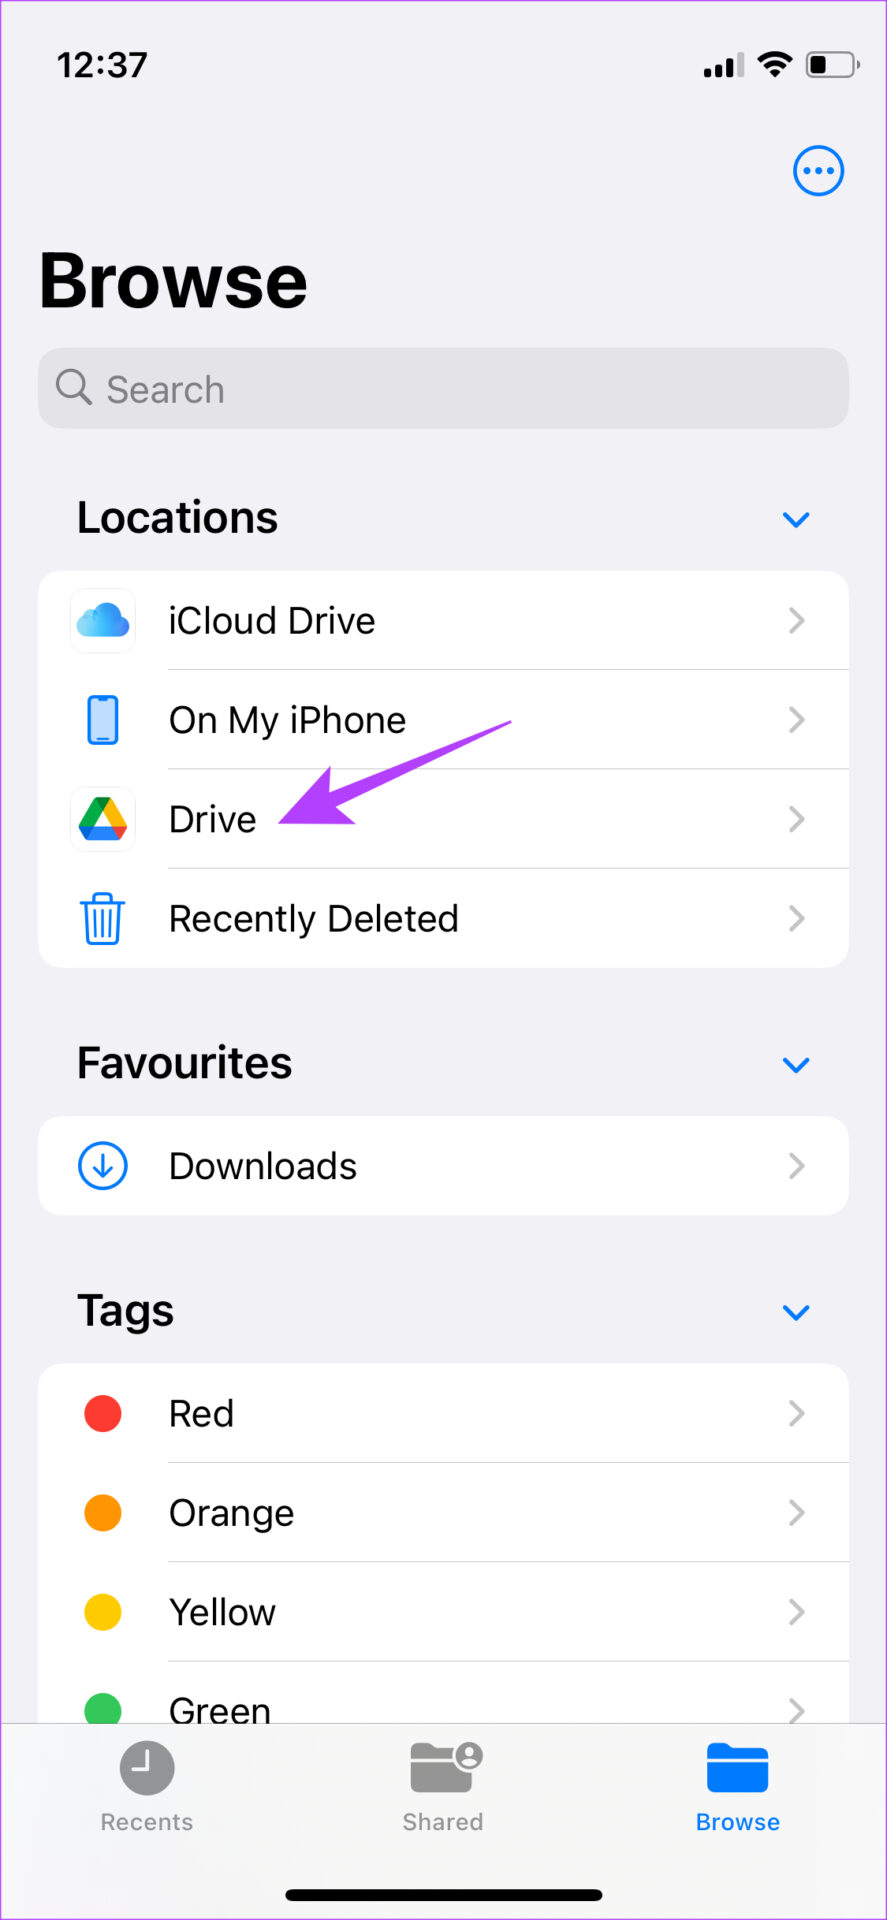
You may have some important files that you’ve downloaded on your iPhone. While there’s no straightforward way to back up those files to google Drive, there’s a neat little trick within the Files app that allows you to do this. Here’s how it works. Step 1: Open the Files app on your iPhone. Step 2: Tap on the three dots in the top-right corner. Step 3: Select Edit. Step 4: Toggle on the Drive option under Locations. If you haven’t already signed in with your Google account on your iPhone, you will be asked to do it. Step 5: Tap on Done. Step 6: Now, navigate to the file(s) you want to back up. Step 7: Tap and hold the file you want to back up till you see additional options. You can also do this with a folder. Step 8: Then, select Copy. Step 9: Go to the main screen on the Files app and choose the Drive option you added under Locations. Step 10: Tap and hold on to any blank space to bring up more options and select Paste. That particular file or folder will now be copied to your Google Drive. Note: You can also use the Google Photos app to back up your photos and videos manually but we don’t recommend it. This is because you need to keep the app open on your iPhone throughout the process while also ensuring that your iPhone’s display doesn’t turn off. This isn’t practical since you can’t use your iPhone for hours.
Store Your Files Safely
Any piece of technology is prone to failure. If your iPhone’s storage partition stops working or if you have to factory reset it, having a backup can always come in handy. It’s nice that the Google Drive app natively gives you the option to back up iPhone data, along with some other useful features like hiding photos and videos on your iPhone. The above article may contain affiliate links which help support Guiding Tech. However, it does not affect our editorial integrity. The content remains unbiased and authentic.